FAQ
-
Who owns my data?
You own your data.
-
What if I would like to run Software that is not in your Applications Marketplace?
If you need a business application that is not currently listed in our Marketplace, please reach out to us. We can add it to InfinCE, and set it up in your private network, provided it supports integration and is compatible with InfinCE’s Single-Sign-On.
-
What happens if an employee leaves the company?
The company’s InfinCE administrator can off-board an employee in one step. A user login that has been deactivated may be assigned to a new employee. If desired, the new employee may be given access to the prior employee’s files to facilitate onboarding.
-
How many employees can I add? Do I pay for each employee as and when I add them?
You can register as many employees as needed. We only bill each employee that has used InfinCE during the calendar month, at the end of the month.
-
What additional applications are available?
The list of InfinCE marketplace applications is growing. Our early efforts focus on opensource applications, but most commercially available software and SaaS applications can be integrated into InfinCE upon request.
-
What do I need to get started with InfinCE?
- A supported device (Desktop, Laptop, Chromebook, Tablet, or Smartphone)
- Internet access
- A Credit card
- We use your internet domain name as your unique InfinCE identifier. (This ensures you have rights to that name.) But if you don’t have one, we can help you get one while you sign up. (The availability and cost of a chosen internet domain name will vary.)
-
Why is InfinCE better than “run-your-business” software?
First, InfinCE’s approach is to let you choose your software from a variety of solution providers. Second, when the provider licenses an open-source product, you are able to change it when and how you may want.
-
What is InfinCE Workplace?
InfinCE is the new way for business to run IT, with a rich set of base functionality and with options to meet just about any special business need. InfinCE Workplace is the name of the standard set of features that come with InfinCE. Workplace includes:
- Secure file sharing and file management
- Collaborative editing tools (documents, spreadsheets, presentations)
- User-defined dashboards with configurable “smart” tiles
- Video chat, Video Meetings, text chat, audio-only calls
- Business email server and client
- Custom mobile app
- Productivity apps (calendar, tasks, media viewer)
- Employee Directory and Contacts list
-
Can you share access to a file via department as well as by name?
Yes. You can share files to teams or departments by name.
-
Does InfinCE provide a way to delegate Admin privileges to selected employees to limit the chance of a rogue SuperAdmin or hacker causing wider damage?
Yes, certain Marketplace Apps have admin roles that control them.
-
Does InfinCE log who and when user roles and privileges are changed?
Yes, InfinCE keeps a track of all the activities within the system in its Logs. These logs are accessible for the Administrator Users.
-
What can I do with the WordPress MarketPlace application?
WordPress can be deployed to host a Website within InfinCE or to manage blogging content. Or both!
-
Are the apps running in the browser using my computer or are they running on the cloud server?
Some things run on the client side (in your browser), some on the server.
-
A few of my users really need a lot of space, but most don’t. Do I have to buy more storage for everyone at the same increment?
No. You can allocate whatever storage amount you wish to each user.
-
What happens if I don’t have internet access? Can I still get my files?
Not today.
-
If my computer is lost or stolen are my files at risk?
Only those files that you have manually downloaded from InfinCE to your computer are at risk. Normally, InfinCE files are stored and edited within the virtual desktop.
-
How can it help a new employee pick up from where a former employee left off?
Providing the new employee access to the former employee’s data is straightforward. When you off-board an employee you have an option to transfer the files to another employee, maybe his immediate manager. When a new employee replaces him, these files can then be transferred to the new person in charge.
-
Does it take much time to get my employees set up with Infince?
No. You can sign up, activate your account, and provision your employees in minutes. The InfinCE support services team is always ready to assist you.
-
How can InfinCE help me with the Offboarding process?
The User Management module on InfinCE Workplace provides a single place for the business owner to control access to the InfinCE environment by the employee.
-
How do I connect InfinCE with SaaS services I want?
If the SaaS application has an API we can integrate them into InfinCE. (Conditions apply, as would SaaS fees).
-
Many people use Microsoft Office. Can I share documents with them?
Yes.
-
Where is my data stored? Is any data stored on my PC?
Your data is stored in a virtual private server, which is accessible only to your company. You can securely access your data through an internet-connected device from anywhere in the world. Apart from files that you allow to be downloaded to a user’s device, all data remains on InfinCE and cannot be saved to a user’s computer.
-
How do I get a new password if I forget mine?
Contact your company’s InfinCE administrator who can reset it for you. If you are an administrator who loses your password, you must contact InfinCE Support for assistance.
-
How do you retrieve an older version of a file?
The older versions of the file can be accessed by the user from the Versions tab of the File details panel.
-
How does InfinCE Files handle “versions” of a file?
InfinCE expires old file versions automatically to ensure that users don’t exceed their storage quotas. This is the default pattern used to delete old versions:
- For the first second, we keep one version
- For the first 10 seconds, we keep one version every 2 seconds
- For the first minute, we keep one version every 10 seconds
- For the first hour, we keep one version every minute
- For the first 24 hours, we keep one version every hour
- For the first 30 days, we keep one version every day
- After the first 30 days, we keep one version every week
The versions are adjusted along this pattern every time a new version is created.
InfinCE never uses more than 50% of the user’s currently available free space. If the stored versions exceed this limit, InfinCE deletes the oldest file versions until it meets the disk space limit again. -
Can I prevent downloading of a file that I share with someone?
Yes, you can prevent the download of a shared file by enabling this option before sharing the link. You also have additional options like allow editing, setting a password and setting an expiration date. Apart from these, you can also delete the shared link, after which the file will no longer be available on that link.
-
Will I be able to log in from two different computers using the same login?
Yes, you’ll be able to log in from two different systems and work simultaneously. This would not cause either of the systems to logout.
-
Will I be able to login from two different computers using the same login?
Yes, you’ll be able to login on two different system and work simultaneously. This would not cause neither of the systems to logout.
-
If I upgrade the cloud configuration can I later lower the configuration? How am I charged?
Yes, but you must contact us to do that. But you can upgrade yourself at any time. ( No storage downgrade is possible)
-
Is there a free trial?
Yes. We are offering a free trial for 30 days. Visit https://fisquare.com/pricing/ to learn about the features included in the trial version.
-
Can I get access to the source code of the open-source app I subscribe to for making the desired changes?
Yes. (Source code is available for those open source apps you subscribe to, however movement of source code changes to the production servers will be done by the InfinCE support/dev team, and service charges may be incurred – this is to ensure application integrity and future update support because of the change.)
-
Is there a cancellation fee?
No. But the fees for the last calendar month must be paid.
-
How am I charged for bandwidth consumption?
There is no extra charge for bandwidth consumed for normal usage.
-
How much bandwidth should I have as a user? For my company?
Bandwidth for 4G cell phone service is fine (3Mbit/sec recommended).
-
How many people can be on a video chat? Is there a maximum number?
Although we don’t have a restriction for the number of users in a call, InfinCE is ideal for up to 8 simultaneous users. InfinCE ensures the highest call quality for your communication. However, as the number of users increases, the quality is automatically adjusted by InfinCE, depending on your Internet speed.
-
Do I need to be an employee to use video chat?
Yes, as these calls are “point-to-point” between InfinCE users.
However, video meetings are hosted from an InfinCE server. Meeting participants do NOT need to be InfinCE users.
-
Can someone outside InfinCE share a file securely with an InfinCE user, for example, a customer?
Yes! In several ways.
1.) You can create a file folder and automatically email its link to your customer. They can open the link and upload files to that folder.
2.) If desired, the folder can be set so that the customer can only upload files to it, not see any files in it.
3.) Optionally, the folder can be set to require a password for it to be accessed (which is emailed separately). Conversely, you can share files with your client. Create a folder so that after you have processed files he has sent you, you can securely provide him access to the files you want him to have.
-
Can someone outside INFINCE share a file securely with an INFINCE user, for example a customer?
Yes! In several ways.
1.) You can create a file folder and automatically email its link to your customer. They can open the link and upload files to that folder.
2.) If desired, the folder can be set so that the customer can only upload files to it, not see any files in it.
3.) Optionally, the folder can be set to require a password for it to be accessed (which is emailed separately). Conversely, you can share files with your client. Create a folder so that after you have processed files he has sent you, you can securely provide him access to the files you want him to have.
-
Can I continue to use, or set up my Email server outside InfinCE?
If you would like to set up or continue to use your Corporate/Business Email (based on your business domain) outside InfinCE, that is absolutely fine. You could sign up for only the InfinCE Workplace to gain access to collaboration tools and business apps.
InfinCE Workplace provides an email client that can be mapped to your external email server if you wish to access your emails from within InfinCE.
-
I have an email account already. How can I convert it to use the InfinCE email server instead?
If you want to synchronize another account with InfinCE and want to get copies of those emails, that can be done.
If you want to replace a mail service (e.g. from Exchange or Gmail) with InfinCE, we must transition the emails that are in the old mailbox over to your InfinCE mail server. That’s a one-time process. -
What if I would like to run Software that is not in your Applications Marketplace?
If you need a business application that is not currently listed in our Marketplace, please reach out to us. We can add it to InfinCE, and set it up in your private network, provided it supports integration and is compatible with InfinCE’s Single-Sign-On.
-
What happens if an employee leaves the company?
The company’s InfinCE administrator can off-board an employee in one step. A user login that has been deactivated may be assigned to a new employee. If desired, the new employee may be given access to the prior employee’s files to facilitate onboarding.
-
Can I download the InfinCE App from Playstore or App store?
No, InfinCE App is not distributed on any public channels. It is an Enterprise specific App that pulls data stored in your own secure, private server. It is themed and branded with your company identity and hence is not published on Playstore/App store.
-
Is this App restricted to employees using InfinCE?
Yes, the app is restricted to employees using InfinCE as they’d need to login to the app using their credentials.
-
What does the Mobile App cost?
The InfinCE Mobile App, customized for each company’s account, is free. Employees can download the iOS and Android apps automatically by scanning the QR code on the page that displays after logging into InfinCE, with their smartphones.
-
How soon after I sign up is the Mobile App available?
Once you sign up, you will need to select the desired design options for the Mobile Apps. These include color selections, company logo and text. This information is processed by us to produce an Android app within 5-10 minutes and iOS app within 1 business day (the Apple App store has a more complex App approval process).
-
Why do I need the app? What are some common use cases that the App is used for?
Briefly speaking, the InfinCE Mobile App makes available on your smartphone, most of the features of your InfinCE virtual desktop. You would have
- Dashboards: Access all your Dashboards from within the App and get your business summary.
- Chats & Video calls: Collaborate with all your colleagues over instant messaging and video/audio calls.
- Directory: You no longer need to manually save the contact information of your colleagues. Directory on InfinCE App enables you to view the profile (Profile pic, phone number, email, and more) of all your colleagues.
- Applications: Let you access your InfinCE Common Tools like Fileshare, email, Tasks, and Calendar, as well as your business applications within InfinCE Workplace.
-
How does InfinCE manage Backups?
We have a basic Backup process in place. For your customized backup needs, please get in touch with our Support Team at [email protected]. Or you can raise a ticket at support.infince.com.
-
Is there any security improvement if I use a VPN to access InfinCE?
Of course, but it’s an unnecessary expense as InfinCE ensures complete security for your data and application.
-
Is my information at risk if I use InfinCE from a location providing Internet access over a publicly available Wi-fi LAN, such as at a Coffee shop?
Without adequate protection on your device running Chrome, your browser could be hijacked, allowing intruders to gain access. Your information on InfinCE will remain safe until the intruder takes control of your device.
-
Can I upload a program of my own onto a VM?
InfinCE takes Security as the highest priority. Therefore you do not have direct access to your VM. However, we can upload your programs on to your private server if required. Customization and other service charges may apply.
-
Does InfinCE employ a Secure Web Gateway to filter unwanted or malicious software from user-initiated web/internet traffic?
Yes. We’re using clustered Cisco ASA firewalls with FirePOWER – services for Intrusion Prevention, url filtering, Advanced malware protection, etc.
-
Does InfinCE use a Web Application Firewall to block http traffic to and from an InfinCE web app?
Yes. We’re using clustered Cisco ASA firewalls with FirePOWER – services for Precise application visibility and control (AVC), etc
-
If my computer is lost or stolen are my files at risk?
Only those files that you have manually downloaded from InfinCE to your computer are at risk. Normally, InfinCE files are stored and edited within the virtual desktop.
-
Can I prevent downloading of a file that I share with someone?
Yes, you can prevent the download of a shared file by enabling this option before sharing the link. You also have additional options like allow editing, setting a password and setting an expiration date. Apart from these, you can also delete the shared link, after which the file will no longer be available on that link.
-
Who owns my data?
You own your data.
-
Does it take much time to get my employees set up with Infince?
No. You can sign up, activate your account, and provision your employees in minutes. The InfinCE support services team is always ready to assist you.
-
Is there a free trial?
Yes. We are offering a free trial for 30 days. Visit https://fisquare.com/pricing/ to learn about the features included in the trial version.
-
What do I need to get started with InfinCE?
- A supported device (Desktop, Laptop, Chromebook, Tablet, or Smartphone)
- Internet access
- A Credit card
- We use your internet domain name as your unique InfinCE identifier. (This ensures you have rights to that name.) But if you don’t have one, we can help you get one while you sign up. (The availability and cost of a chosen internet domain name will vary.)
-
How can I sign up with my existing business domain and email server?
If you have already registered your business domain and set up your professional email, you can opt for just the InfinCE Workplace during Sign up. Please follow the Signup instructions below.
InfinCE Workplace automatically provides an email client that can be mapped to your existing mail server. After Sign up, you can also buy the WordPress Application as an add-on, if you wish to set up or move your business website within InfinCE. This will help you manage all your IT assets from one platform, making it easy to manage your processes.
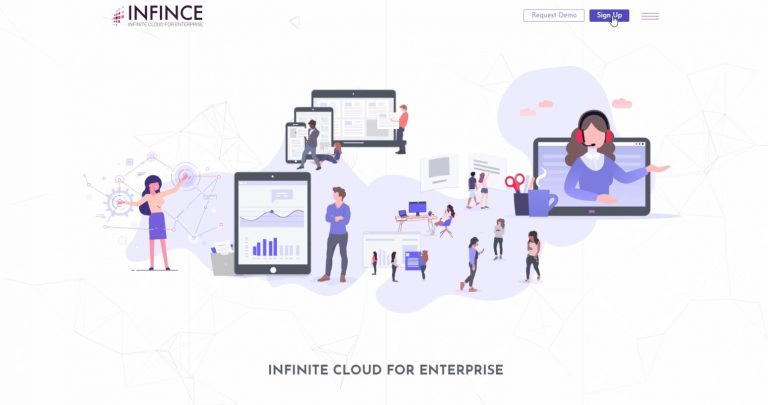
Step 1. Click on the “Sign Up” button on the top right corner of the InfinCE website.
Step 1 – Click on Sign Up Step 2 – Contact Information. Fill your Contact details in the form and click “Next”
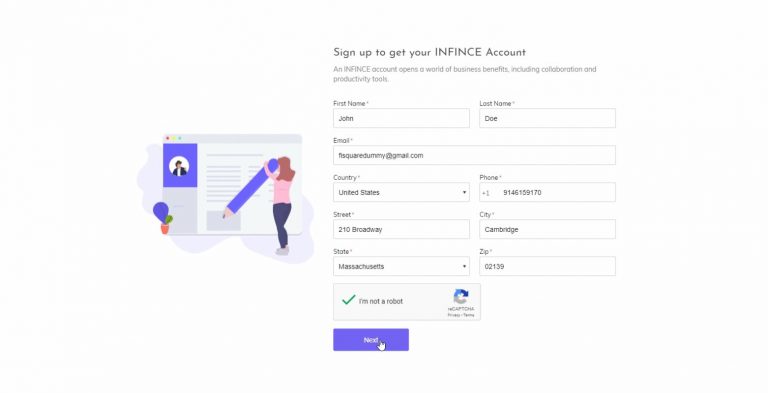
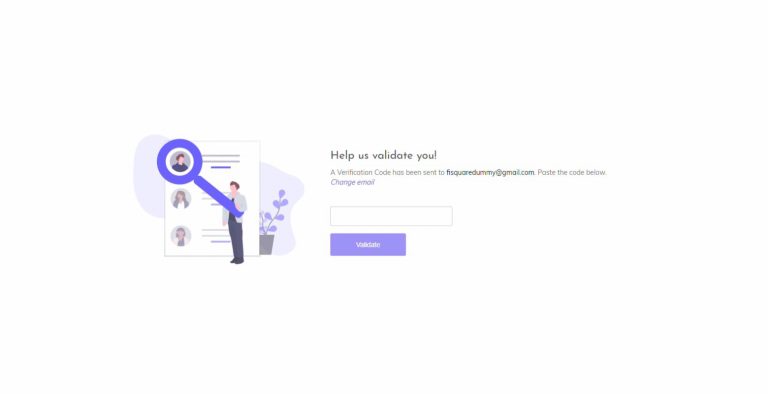
Step 2 – Contact Information Step 3 – Validate Email. A validation code will now be sent to your email (provided in Step 2). Grab this code and enter it on the next screen to help us validate you.
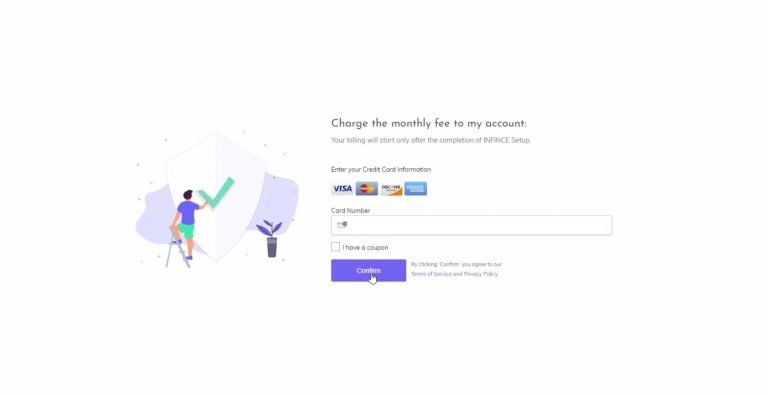
Step 3 – Validate Email Step 4 – Credit Card Details. In the next screen, fill in your Credit Card details. (Usage Billing is only done at the end of the calendar month. The first-month bill will be pro-rated for the number of days of use.)
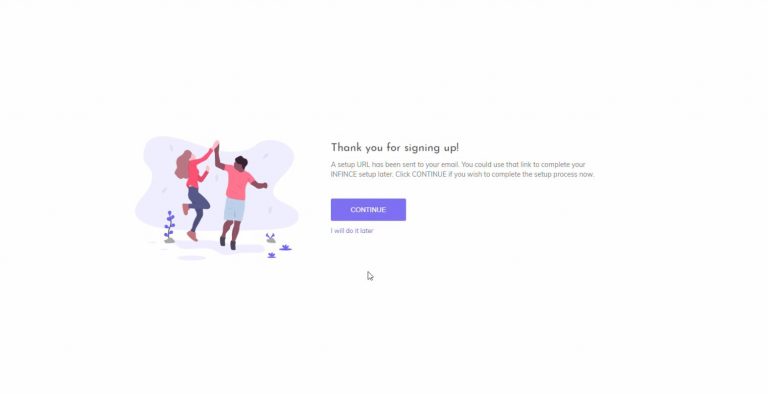
Step 4 – Enter Credit Card Details Step 5. You would now receive an email confirming the completion of the first stage of Sign Up. Click on the CONTINUE button to complete the rest of the process. If for some reason you wish to continue later, you can pick up from this stage by clicking on the “CHOOSE PLAN” button in your email.
Step 5 – Continue to Choose Plan 
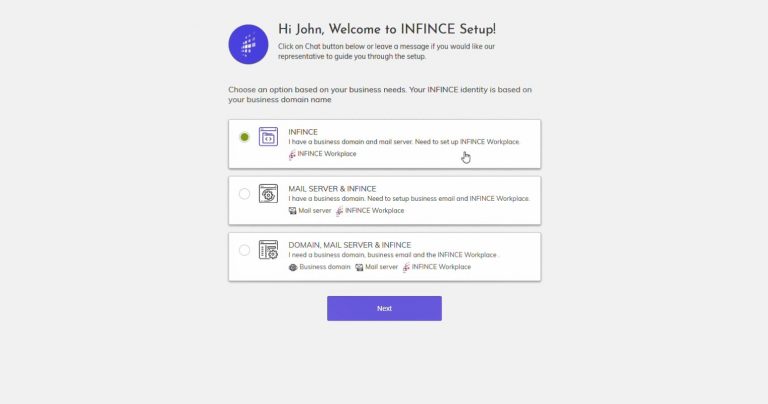
Step 5 – Use the link provided in the email if you wish to continue later Step 6. In the next step, choose the option “InfinCE”, since you already have a business domain and a professional email.
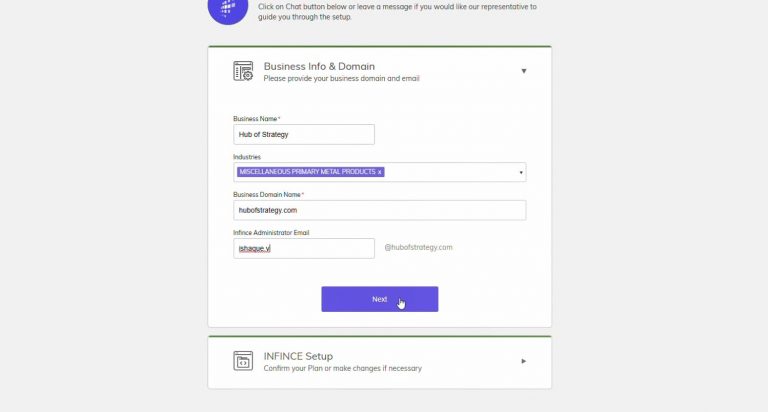
Step 6 – Choose “InfinCE” to sign up for InfinCE Workplace Step 7 – Business & Domain Info. In this step, provide your business name, applicable industries, and your existing business domain. Also, provide the email id (based on your business domain) that would be used as the InfinCE Administrator login. This can be someone else in your organization who would be managing InfinCE. You can also use this id to set up other Administrator profiles once InfinCE is set up.
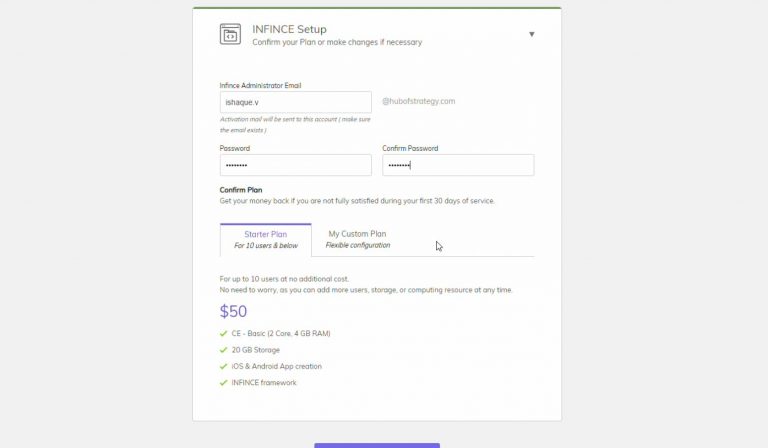
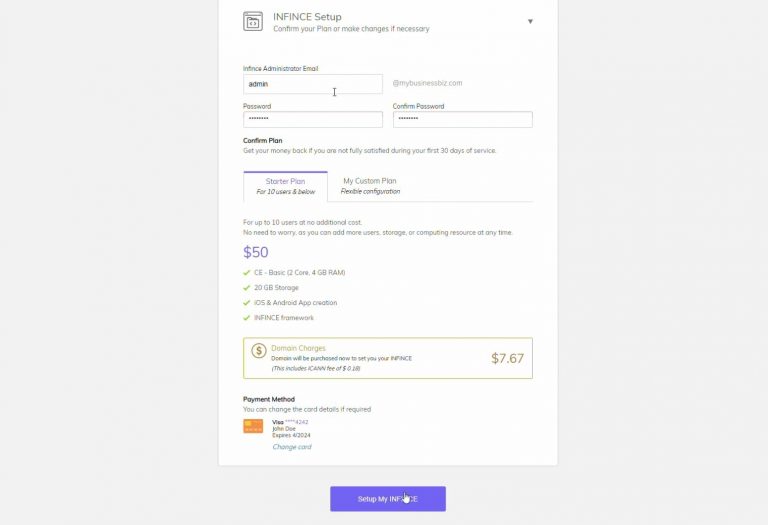
Step 7 – Provide your business and domain info Step 8 – InfinCE Setup. You can now set up the login credentials for the primary InfinCE Administrator. Choose a plan; you can get started with the Starter plan having basic Server configuration or customize a plan based on your needs. See Pricing for more details.
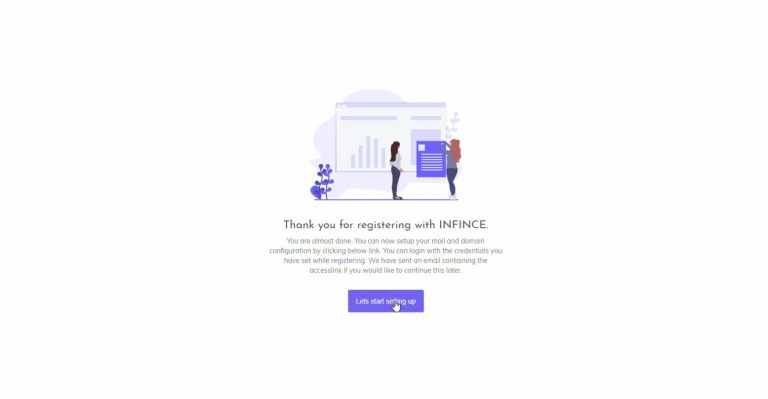
Step 8 – Set up InfinCE Step 9.– Sign Up Complete. Your registration process is now complete and you should receive an email confirming the same.
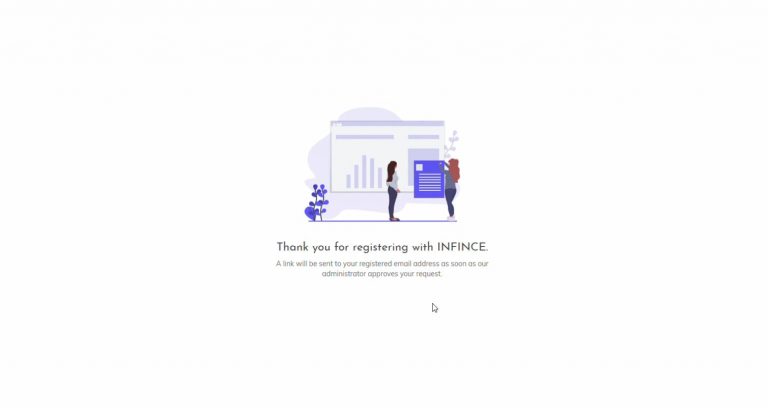
Step 9 – Sign Up Complete Step 10 – Activation. Once your InfinCE server is up and running, you would receive an activation mail. Login to start exploring all the features; happy collaboration @InfinCE!
-
How can I sign up if I already have a business domain but don’t have Email Server?
If you have already registered a domain for your business but have not set up the Email Server, you can opt for an Email Server and InfinCE Workplace during your Sign up. Please follow the steps below to complete your Sign up successfully.
Step 1. Click on the “Sign Up” button on the top right corner of the InfinCE website.
Step 2 – Contact Information. Fill your Contact details in the form and click “Next”
Step 2 – Contact Information Step 3 – Validate Email. A validation code will now be sent to your email (provided in Step 2). Grab this code and enter it on the next screen to help us validate you.
Step 3 – Validate Email Step 4 – Credit Card Details. In the next screen, fill in your Credit Card details. (At the end of Sign up, your card would be charged for the cost of the domain that you purchase. Usage Billing is only done at the end of the calendar month. The first-month bill will be pro-rated for the number of days of use.)
Step 4 – Enter Credit Card Details Step 5. You would now receive an email confirming the completion of the first stage of Sign Up. Click on the CONTINUE button to complete the rest of the process. If for some reason you wish to continue later, you can pick up from this stage by clicking on the “CHOOSE PLAN” button in your email.
Step 5 – Continue to Choose Plan Step 5 – Continue Later by clicking on Email Step 6. In the next step, choose the option “MAIL SERVER & InfinCE”, since you only need business email apart from InfinCE Workplace.
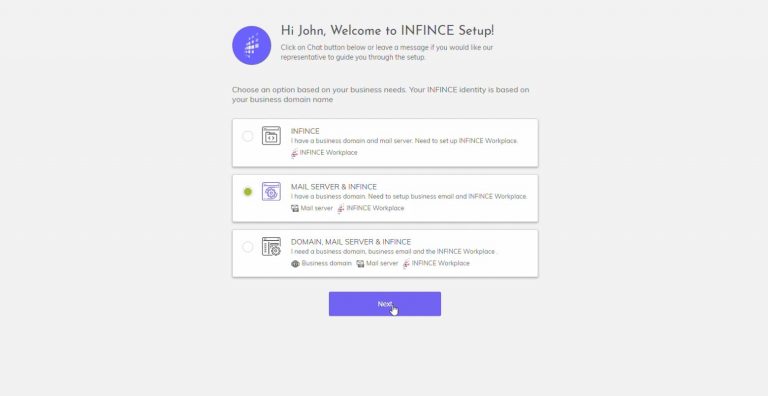
Step 6 – Choose ‘MAIL Server & InfinCE” Step 7 – Email Setup. In this step, provide your business name, applicable industries, and your existing business domain. This will be used to set up your Email Server.
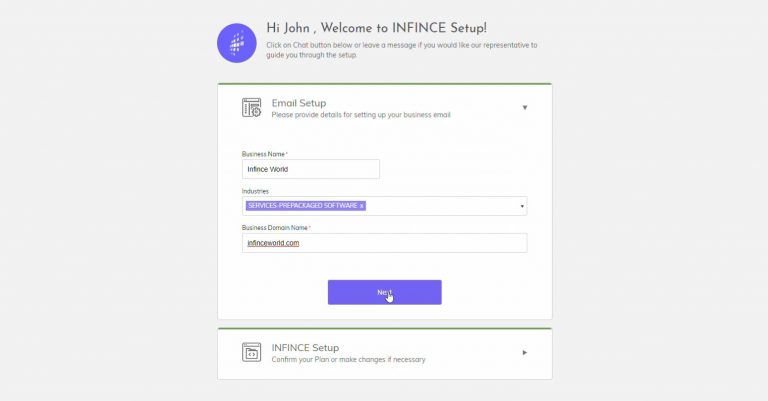
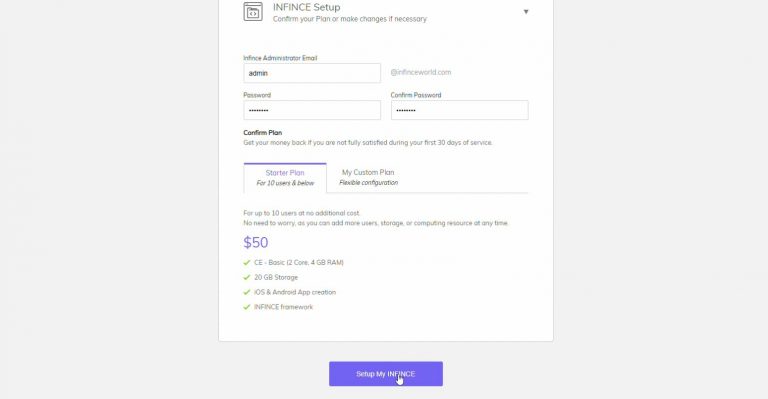
Step 7 – Email Setup Step 8 – InfinCE Setup. You can now set up the login credentials for your primary InfinCE Administrator. Choose an appropriate login name for your administrator profile (this could be someone else in your organization who would be managing InfinCE). You can get started with the Starter plan having basic Server configuration or customize a plan based on your needs. See Pricing for more details.
Step 8 – InfinCE Setup Step 9.– Sign Up Complete. Your registration process is now complete and you should receive an email confirming the same.
Step 9 – Setup Complete Step 10 – Email Configuration. Before the InfinCE Server can be set up for you, we would require you to validate the domain details. Details for this verification are explained below. Log in to your InfinCE Url (refer email received in Step 9) with the login credentials (provided in Step 8).
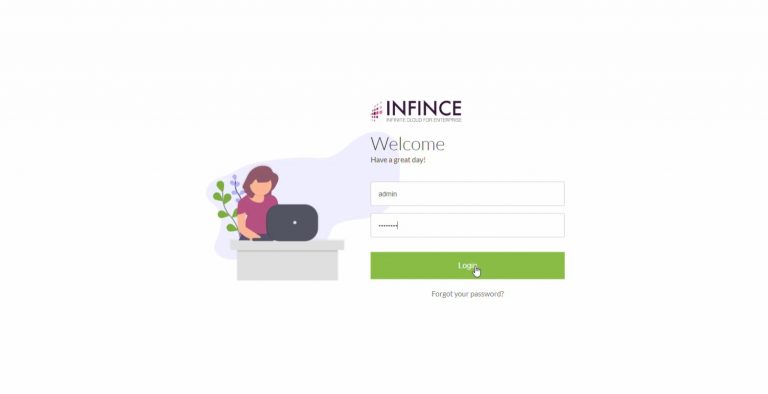
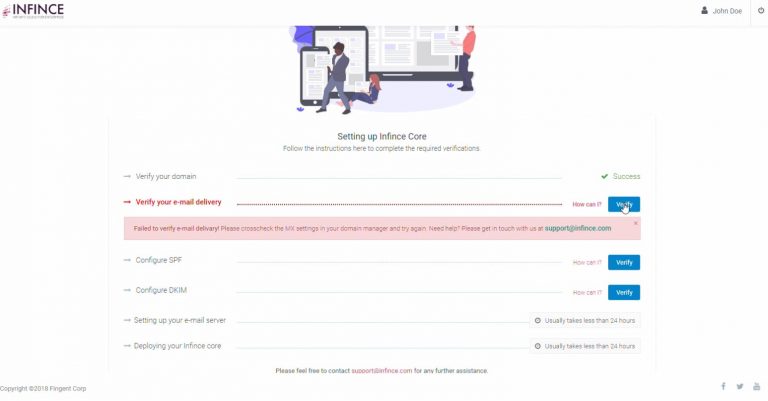
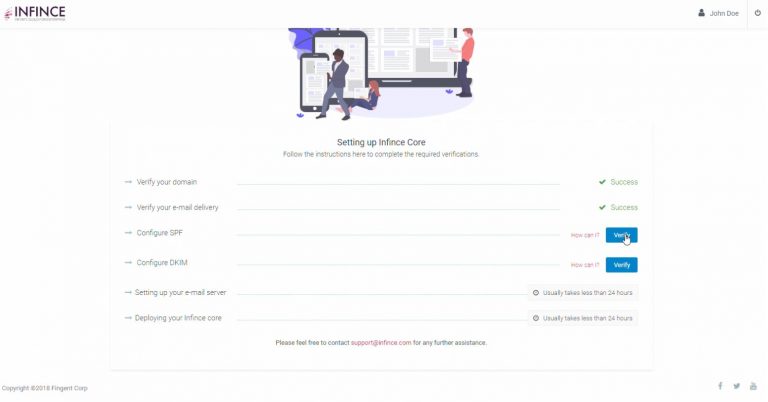
Step 10 – Login to InfinCE Step 10.a – Email Configuration- Verify Domain. You will see the screen below which indicates the 4 pending verification steps to complete your email configuration. Click on the first Verify button to start verification of your domain.
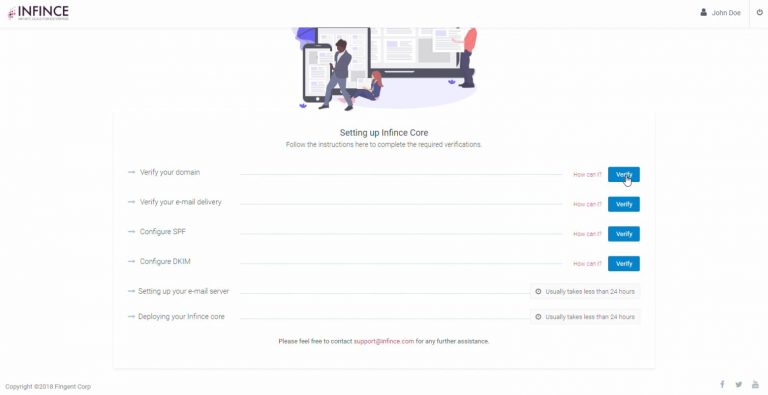
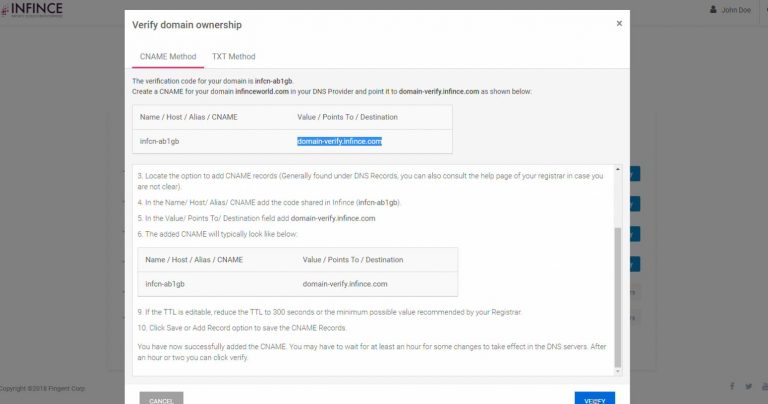
Step 10 – Email Configuration Status You will see the detailed instructions on this screen. The Name/Host/Alias/CNAME provided at the top needs to be associated with the given Value in your DNS Manager to verify your domain ownership.
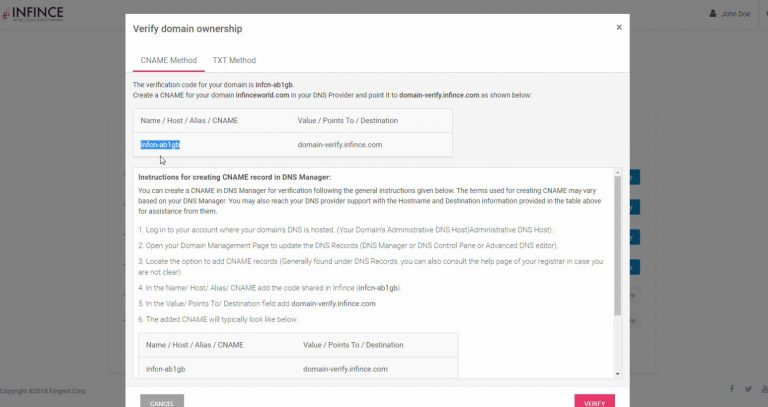
Follow the instructions to create a CNAME record in your DNS Manager. Screenshot given for your reference, but the exact interface would vary depending on your Domain Registrar
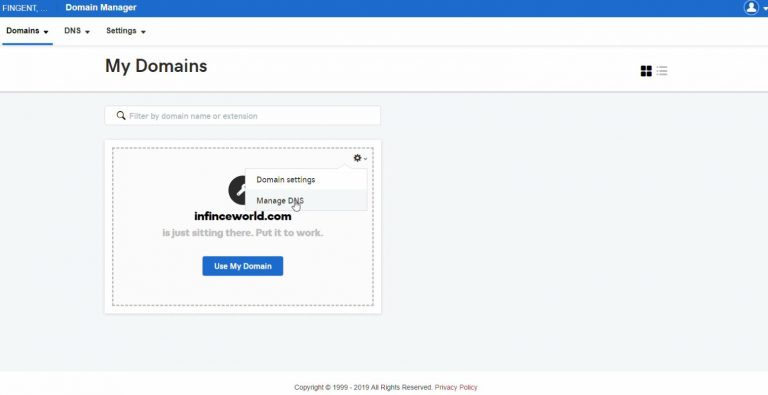
Access the “DNS Management” section in your Domain Manager. 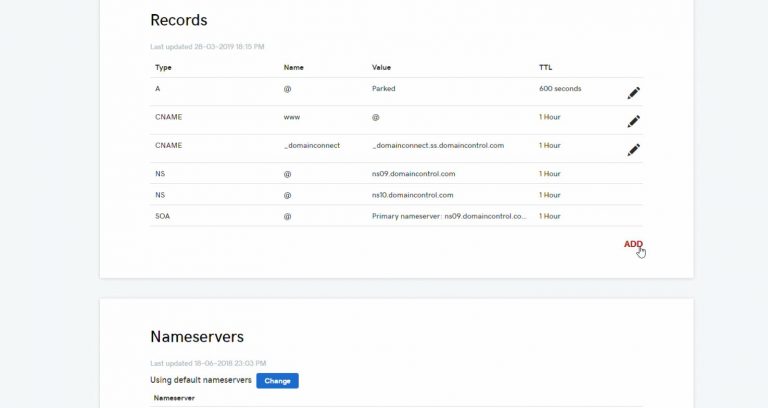
Click on “ADD” button to add a new association record. 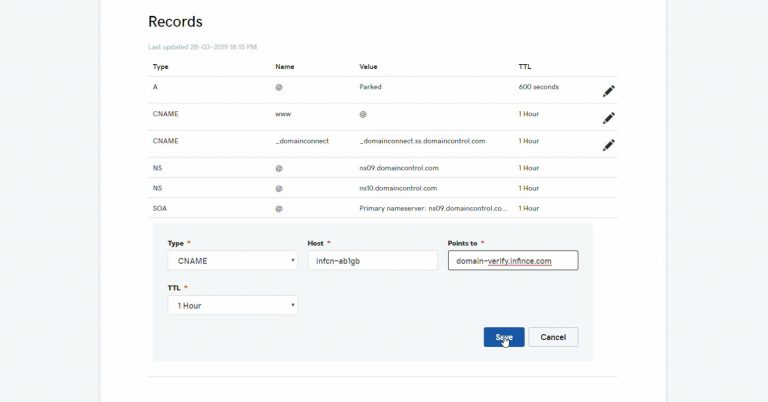
Provide the ‘Host’ and ‘Points to’ values for the CNAME record with values copied from the InfinCE-Verify Domain screen. If TTL is editable, reduce it to 300s or minimum possible value. Click on “SAVE”. Click on the “Verify” button at the bottom.
Once the record has been saved in your DNS Manager, click on the “Verify” button on this screen. The ‘Verify Domain” step is now complete and this should indicate Success.
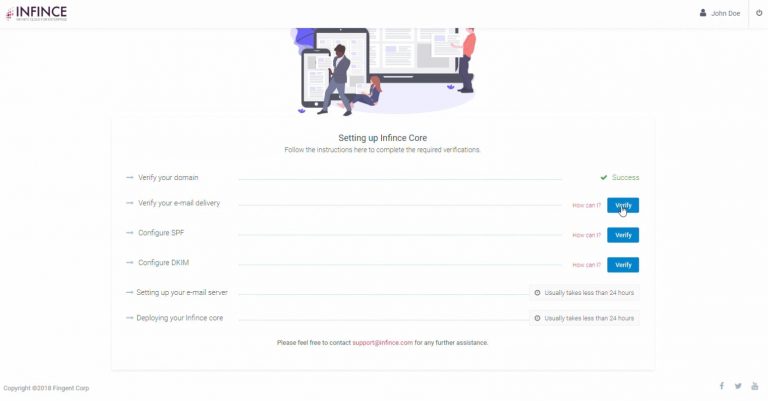
Email Setup – Verify Domain is successful Step 10.b – Email Configuration – Verify Email Delivery. Click on the “Verify” button against “Verify your e-mail delivery” to initiate this step (refer screen above). This step requires setting up the 2 MX records shown on top of the screen in your DNS Manager.
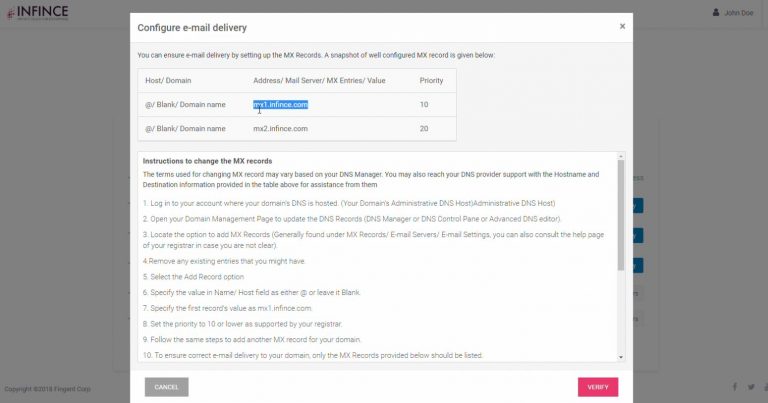
Instructions for adding MX records in your DNS Manager Follow the instructions to create MX records in your DNS Manager. Screenshots below are given for your reference, but the exact interface would vary depending on your Domain Registrar.
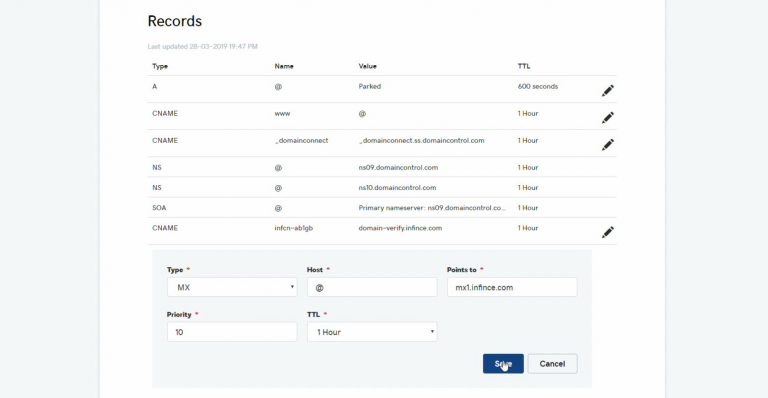
Add first MX record in your DNS Manager 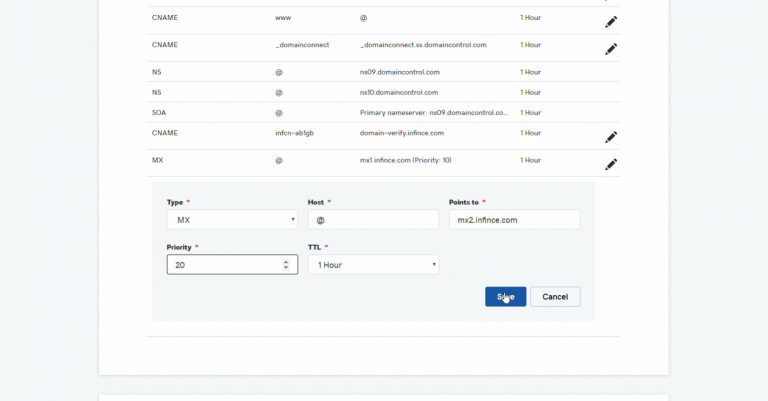
Add second MX record in your DNS Manager 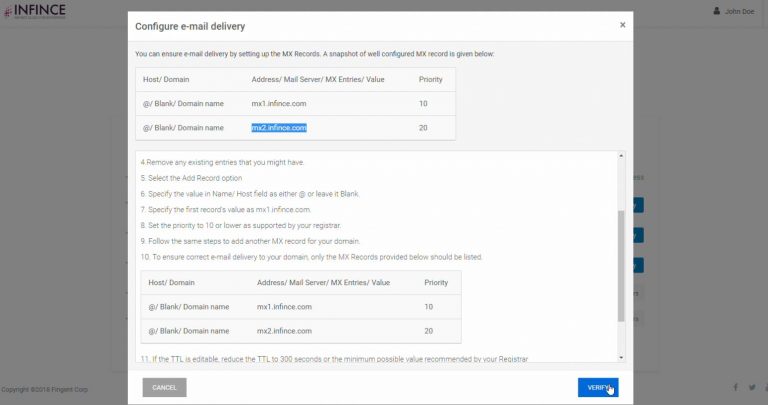
Click on the Verify button to verify the e-mail delivery In some cases, the propagation time for your Registrar may take longer and you may see an error like below. In this case, wait for a while and click on the Verify button again.
If there is a delay, it may cause a failure message. Click on Verify again. Step 10.c – Email Configuration – Configure SPF. Click on “Verify” against “Configure SPF” to get instructions on how to set up a TXT record for your domain in your DNS Provider.
Click on “Verify” against “Configure SPF” 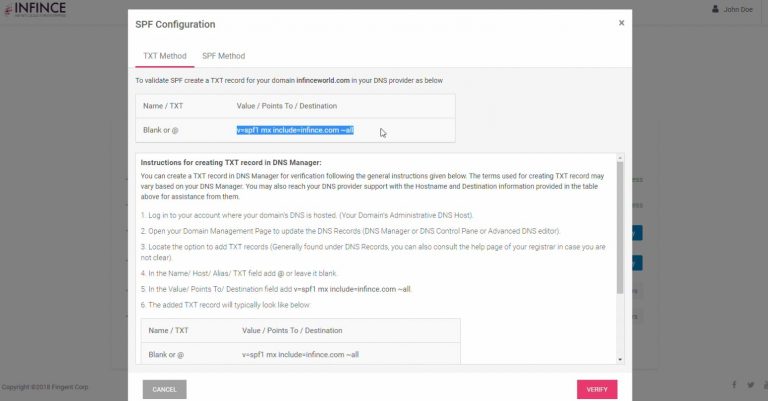
Instructions for adding TXT record for your domain in DNS provider 
Add TXT record with the values provided by InfinCE. This screen may look different for your domain registrar. Step 10.d – Email Configuration – Configure DKIM. Click on “Verify” against “Configure DKIM”. The instructions will help you create a TXT record in your DNS provider to validate DKIM.

Instructions to validate your DKIM by adding a TXT record in your DNS provider 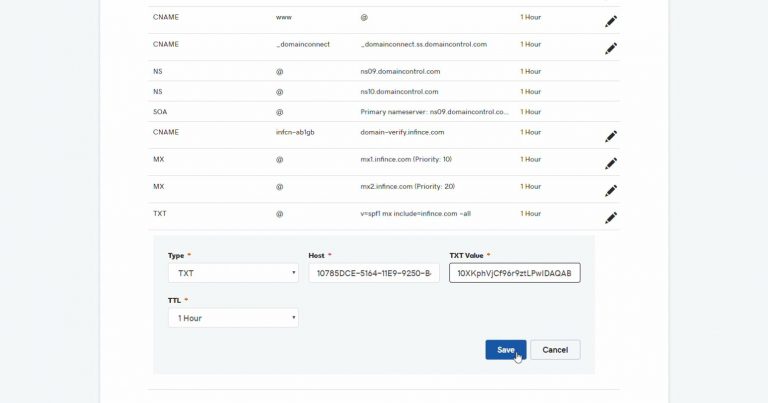
Add TXT record with values given in InfinCE. This screen could look different for your domain registrar. 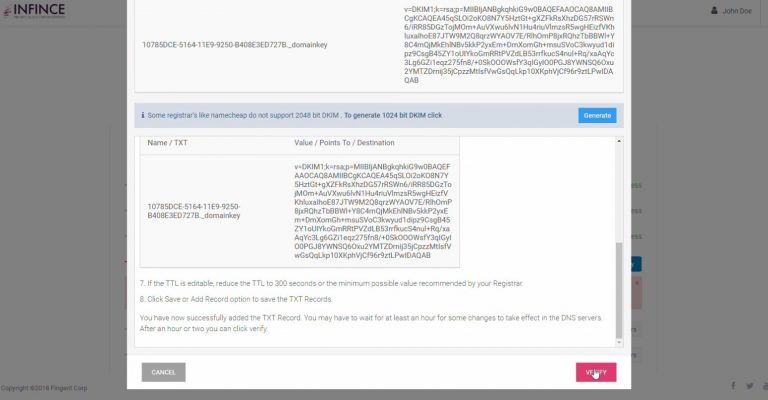
Click “Verify” to validate DKIM Once the 4 Verification steps are done, you should see ‘Success” against all of them. All the actions required from your end are complete now. InfinCE Support Team will now initiate the set up of your InfinCE Server and Email service. These should be active within 1 business day.
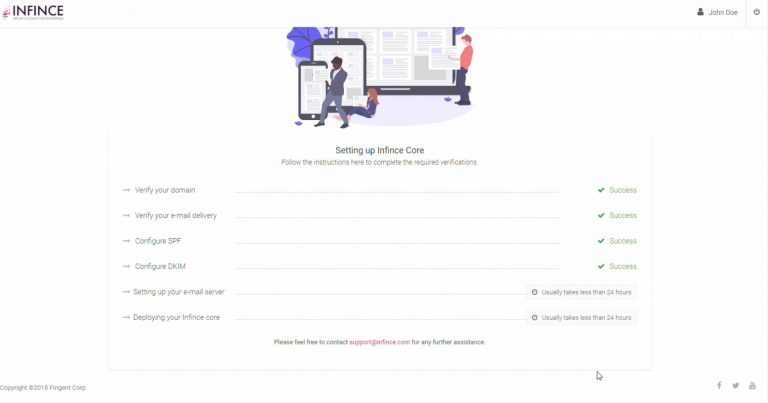
Email Configuration Complete. Step 11 – Activation. Once your InfinCE server is up and running, you would receive an activation mail. Login to start exploring all the features; happy collaboration @InfinCE!
-
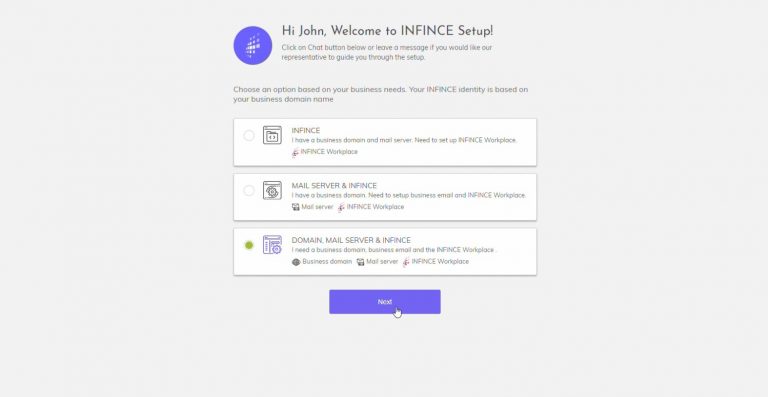
How can I sign up for InfinCE without a business domain?
If you are just starting up your business and do not have a business domain yet, follow the Sign-up process below. This would take you through registering your business domain, setting up your professional email, and finally configuring your InfinCE Workplace.
Step 1. Click on the “Sign Up” button on the top right corner of the InfinCE website.
Step 2 – Contact Information. Fill your Contact details in the form and click “Next”
Step 2 – Contact Information Step 3 – Validate Email. A validation code will now be sent to your email (provided in Step 2). Grab this code and enter it on the next screen to help us validate you.
Step 3 – Validate Email Step 4 – Credit Card Details. In the next screen, fill in your Credit Card details. (At the end of Sign up, your card would be charged for the cost of the domain that you purchase. Usage Billing is only done at the end of the calendar month. The first-month bill will be pro-rated for the number of days of use.)
Step 4 – Enter Credit Card Details Step 5. You would now receive an email confirming the completion of the first stage of Sign Up. Click on the CONTINUE button to complete the rest of the process. If for some reason you wish to continue later, you can pick up from this stage by clicking on the “CHOOSE PLAN” button in your email.
Step 5 – Continue to Choose Plan Step 5 – Continue Later by clicking on Email Step 6. In the next step, choose the option “DOMAIN, MAIL SERVER & InfinCE”, since you need a business domain, business website hosting, and business email apart from InfinCE Workplace.
Step 6 – Choose ‘Domain, Mail Server & InfinCE’ Step 7 – Domain & Email Setup. In this step, provide your business name and the applicable industries. Choose a suitable domain for your business. If your primary choice is not available, the system suggests close alternatives. (In case you wish to purchase a domain that costs more than $30, you may need to do the domain purchase outside of this Sign Up. Contact us if you need guidance). The contact information on this screen would be used for registration of the website and can be different from what you have entered in Step 1.

Step 7 – Choose your Domain Step 8 – InfinCE Setup. You can now set up the login credentials for your primary InfinCE Administrator. Choose an appropriate login name for your administrator profile (this could be someone else in your organization who would be managing InfinCE). You can get started with the Starter plan having basic Server configuration or customize a plan based on your needs. See Pricing for more details.
The registration charge for your chosen domain will be listed at the bottom.
Step 8 – InfinCE Set Up Step 9.– Sign Up Complete. Your registration process is now complete and you should receive an email confirming the same.
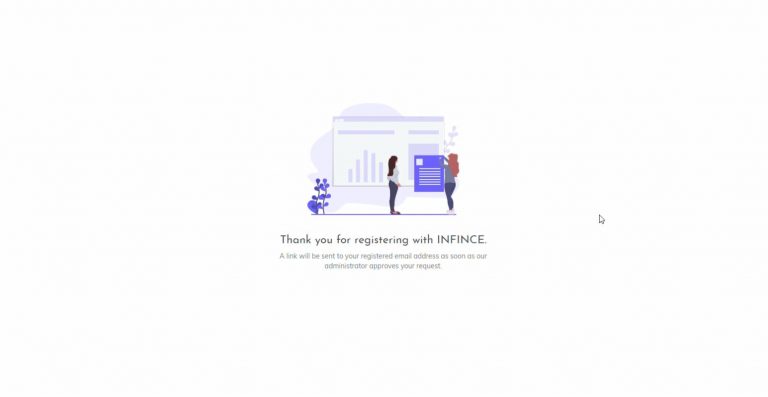
Step 9 – Set Up Complete 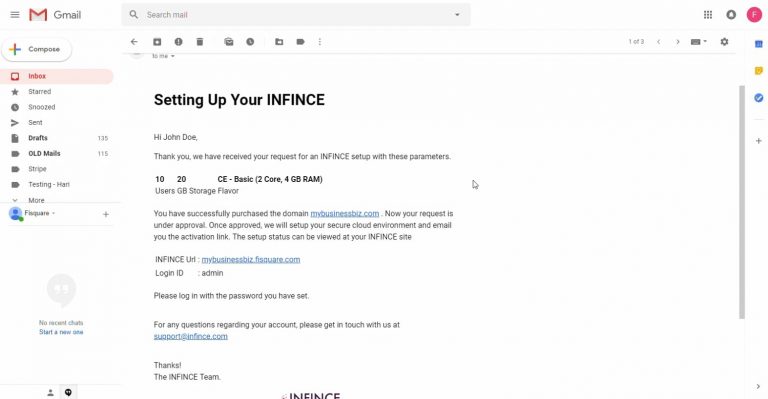
Step 9 – Set Up Completion Email Step 10 – InfinCE Server Set Up in progress. Your server would now get configured and created at the backend. This might take up to 1 business day. Meanwhile, you can always check on the status by logging in to your InfinCE Url (refer email received in Step 9) with the login credentials (provided in Step 8).
Step 10 – Login to InfinCE 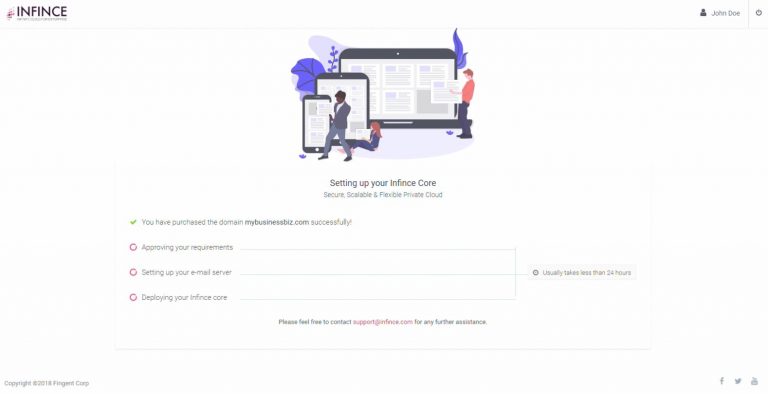
Step 10 – View Status of InfinCE Server Set up Step 11 – Activation. Once your InfinCE server is up and running, you would receive an activation mail. Login to start exploring all the features; happy collaboration @InfinCE!
-
How can I Sign up for InfinCE?
You can sing up for InfinCE at https://fisquare.com/pricing/. To experience the cloud platform first-hand, our 30-day free trial can be availed.
Our paid options include Starter and Advanced. For up to 10 users, the Starter plan at $50/month can be chosen. Beyond 10 users, you can opt for the Advanced Plan, the pricing for which depends on your server, storage, and user configurations.
-
Do I have access to the source code for an App that I license?
The applications we are providing are based on open source. You can get access to the application-specific git repositories/source from their corresponding sites. ( However, you won’t be getting source code of InfinCE Common (productivity tools) for security reasons.)
-
Can I make business Applications within InfinCE available to registered users who are not InfinCE users?
Purely depends on the application ( for example – if Mautic is concerned only InfinCE users can access it. But for “OpenProject” – there is provision to give access to external users )
-
Is there any security improvement if I use a VPN to access InfinCE?
Of course, but it’s an unnecessary expense as InfinCE ensures complete security for your data and application.
-
Is my information at risk if I use InfinCE from a location providing Internet access over a publicly available Wi-fi LAN, such as at a Coffee shop?
Without adequate protection on your device running Chrome, your browser could be hijacked, allowing intruders to gain access. Your information on InfinCE will remain safe until the intruder takes control of your device.
-
Can I suspend an App (so it can be restarted later) and not have to pay for it?
No, to suspend an App on a VM you must contact us. We can make backup copies if needed.
-
Do you have a database like MS Access that I can use to work with larger datasets?
Yes, but that has to be provided as a custom application.
-
Can I upload a program of my own onto a VM?
InfinCE takes Security as the highest priority. Therefore you do not have direct access to your VM. However, we can upload your programs on to your private server if required. Customization and other service charges may apply.
-
Can I still use the software and files on my PC and Mac?
Of course. But files saved on your computer will be at greater risk if your device is lost or stolen.
-
Can InfinCE help me manage the logins to my other SaaS applications used by my company?
As long as a SaaS application supports an API and single sign-on, we can set it up so that you can disable an employee’s access across the platform in one step. That way you can prohibit an employee from accessing InfinCE, and he will lose access to all the SaaS accounts that were set up to use within InfinCE.
-
Does InfinCE run on Chromebooks with Chrome OS? Fuchsia?
Yes.
-
Does InfinCE employ a Secure Web Gateway to filter unwanted or malicious software from user-initiated web/internet traffic?
Yes. We’re using clustered Cisco ASA firewalls with FirePOWER – services for Intrusion Prevention, url filtering, Advanced malware protection, etc.
-
Does InfinCE use a Web Application Firewall to block http traffic to and from an InfinCE web app?
Yes. We’re using clustered Cisco ASA firewalls with FirePOWER – services for Precise application visibility and control (AVC), etc
-
What can I do with the WordPress MarketPlace application?
WordPress can be deployed to host a Website within InfinCE or to manage blogging content. Or both!
-
How do I connect InfinCE with SaaS services I want?
If the SaaS application has an API we can integrate them into InfinCE. (Conditions apply, as would SaaS fees).
-
Many people use Microsoft Office. Can I share documents with them?
Yes.
-
Where is my data stored? Is any data stored on my PC?
Your data is stored in a virtual private server, which is accessible only to your company. You can securely access your data through an internet-connected device from anywhere in the world. Apart from files that you allow to be downloaded to a user’s device, all data remains on InfinCE and cannot be saved to a user’s computer.
-
How do you retrieve an older version of a file?
The older versions of the file can be accessed by the user from the Versions tab of the File details panel.
-
How does InfinCE Files handle “versions” of a file?
InfinCE expires old file versions automatically to ensure that users don’t exceed their storage quotas. This is the default pattern used to delete old versions:
- For the first second, we keep one version
- For the first 10 seconds, we keep one version every 2 seconds
- For the first minute, we keep one version every 10 seconds
- For the first hour, we keep one version every minute
- For the first 24 hours, we keep one version every hour
- For the first 30 days, we keep one version every day
- After the first 30 days, we keep one version every week
The versions are adjusted along this pattern every time a new version is created.
InfinCE never uses more than 50% of the user’s currently available free space. If the stored versions exceed this limit, InfinCE deletes the oldest file versions until it meets the disk space limit again. -
If I upgrade the cloud configuration can I later lower the configuration? How am I charged?
Yes, but you must contact us to do that. But you can upgrade yourself at any time. ( No storage downgrade is possible)